Dining Table legs Home Depot
Farmhouse Dining Table
This DIY Farmhouse Table is the perfect beginner-level building project. Building a dining table doesn’t get any easier – using minimal tools with pre-fabricated furniture legs and off-the-shelf lumber, you can build this table in an afternoon and be hosting your family gathering by dinnertime!
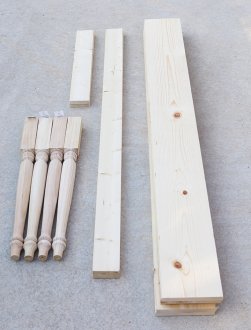
Cut List
- Long Aprons – (2) 1 x 4 @ 63 inches
- Short Aprons – (2) 1 x 4 @ 25 inches
- Tabletop Supports – (3) 1 x 4 @ 26 ¾ inches
- Tabletop Boards – (5) 1 x 8 @ 67 inches
- Breadboard Ends – (2) 1 x 6 @ 36 ¼ inches
Step 1: Cut the Boards and Drill Pocket Holes
Use the cut list above and cut all of the boards except the breadboard ends to length. Using a pocket hole jig, drill two ¾-inch pocket holes at the ends of each 1 x 4 apron. Also, drill pocket holes along one edge of the aprons, spacing each pocket hole about 6 – 8 inches apart. Drill pocket holes into the ends and edges of the tabletop boards as well.

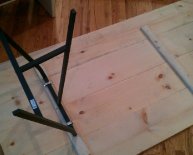
Step 2: Attach the Short Aprons to the Furniture Legs
Clamp the furniture leg to the work surface. Apply wood glue to the end of the 1 x 4 short apron and position the apron at the top of the leg, centering the apron on the leg so that the apron is slightly inset. Tip: Use a scrap piece of ¾ inch material to support the apron in the center of the leg.
Using a drill/driver, fasten the apron to the leg with 1 ¼-inch pocket hole screws. Do this for both sides.
Step 3: Build the Table Carcass
 Build the carcass by attaching the long aprons to the legs with 1 ¼-inch pocket screws and wood glue. Ensure that the pocket holes along the edge are facing up, to attach the tabletop in later steps.
Check for square by measuring the diagonal dimensions. These measurements should match. Adjust as needed.
Step 5: Build the Tabletop
Clamp the 1 x 8 boards to the work surface and attach the boards, edge-to-edge, with 1 ¼-inch pocket hole screws.
Step 6: Trim the Tabletop
Clamp a straight edge close to the end of the planked tabletop and use a circular saw to trim any uneven boards so that the whole tabletop end is flush and straight.
Step 7: Cut and Attach the Breadboard Ends
Measure the short ends of the planked tabletop and cut the breadboards to fit. Drill ¾-inch pocket holes along one edge of the breadboards and attach to the tabletop with 1 ¼-inch pocket hole screws.
Step 8: Attach the Tabletop to the Carcass
Place the tabletop (pocket holes facing you) on the work surface and center the carcass upside down on the tabletop. Attach the carcass to the tabletop with 1 ¼-inch pocket hole screws. Attach four angle braces as shown, for added support to the breadboard ends.


Share this article
Related Posts


Latest Posts


